Figma Translation Plugin - Complete User Guide
Welcome to the comprehensive user guide for the Figma Translation Plugin! This powerful tool streamlines the process of translating designs directly within Figma, eliminating manual workflows and saving hours of work for international design teams.
This guide will walk you through every feature step-by-step, from initial setup to advanced translation workflows.
1. Getting Started & Installation
Installing the Plugin
- Open Figma and navigate to the Plugins menu
- Search for "Figma Translation Plugin" in the plugin directory
- Click Install to add the plugin to your workspace
- The plugin will appear in your plugins list for future use

System Requirements: The plugin works with both Figma desktop app and web browser versions. Ensure you have an active internet connection for translation services.
2. Login Process
Authentication Setup
The plugin uses secure Google OAuth authentication to manage your translation projects and settings.
Step-by-Step Login:
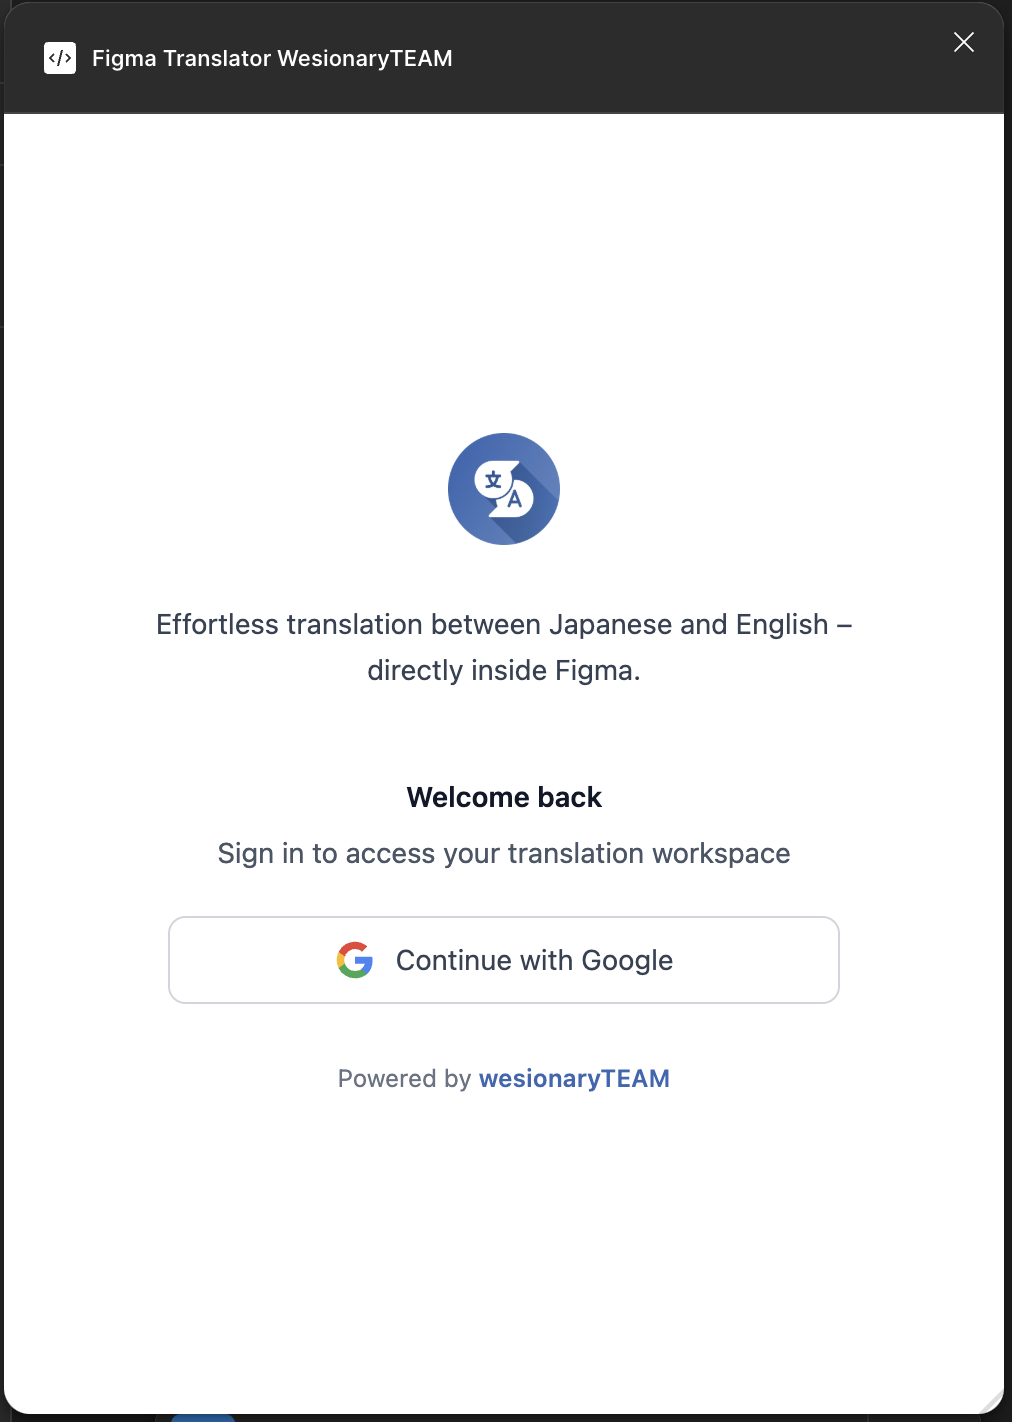
- Launch the Plugin: From Figma's plugins menu, select the Translation Plugin
- Login Screen: You'll see the welcome screen with the plugin logo and login options
- Google Authentication: Click the "Continue with Google" button
- Authorization: A new browser window will open for Google OAuth
- Grant Permissions: Authorize the plugin to access your account
- Automatic Redirect: The plugin will automatically detect successful authentication
- Dashboard Access: You'll be redirected to the main plugin dashboard
💡 Tip: The plugin includes automatic token refresh, so you won't need to log in repeatedly during your session.
⚠️ Important: If login fails, check your internet connection and try again. The plugin retries authentication automatically for up to 6 minutes.
Selecting Frames for Translation
The plugin automatically extracts text from selected Figma frames, identifying all text elements that need translation.
How to Extract Text:
- Select Frames: In your Figma canvas, select one or more frames containing text elements
- Open Plugin: Launch the Translation Plugin from the plugins menu
- Project Selection: Choose or create a project to organize your translations
- Automatic Detection: The plugin will scan selected frames and identify all text nodes
- Text Inventory: View the complete list of extracted text in the translation workspace
✨Smart Text Detection: The plugin automatically identifies text elements, including those in components, groups, and nested frames.
Understanding Text Analysis
The plugin provides intelligent analysis of your text content:
- Language Detection: Automatically identifies Japanese and English text
- Content Filtering: Options to exclude numbers, symbols, and special characters
- Duplicate Management: Identifies unique text for efficient translation
- Context Preservation: Maintains the relationship between text and design elements
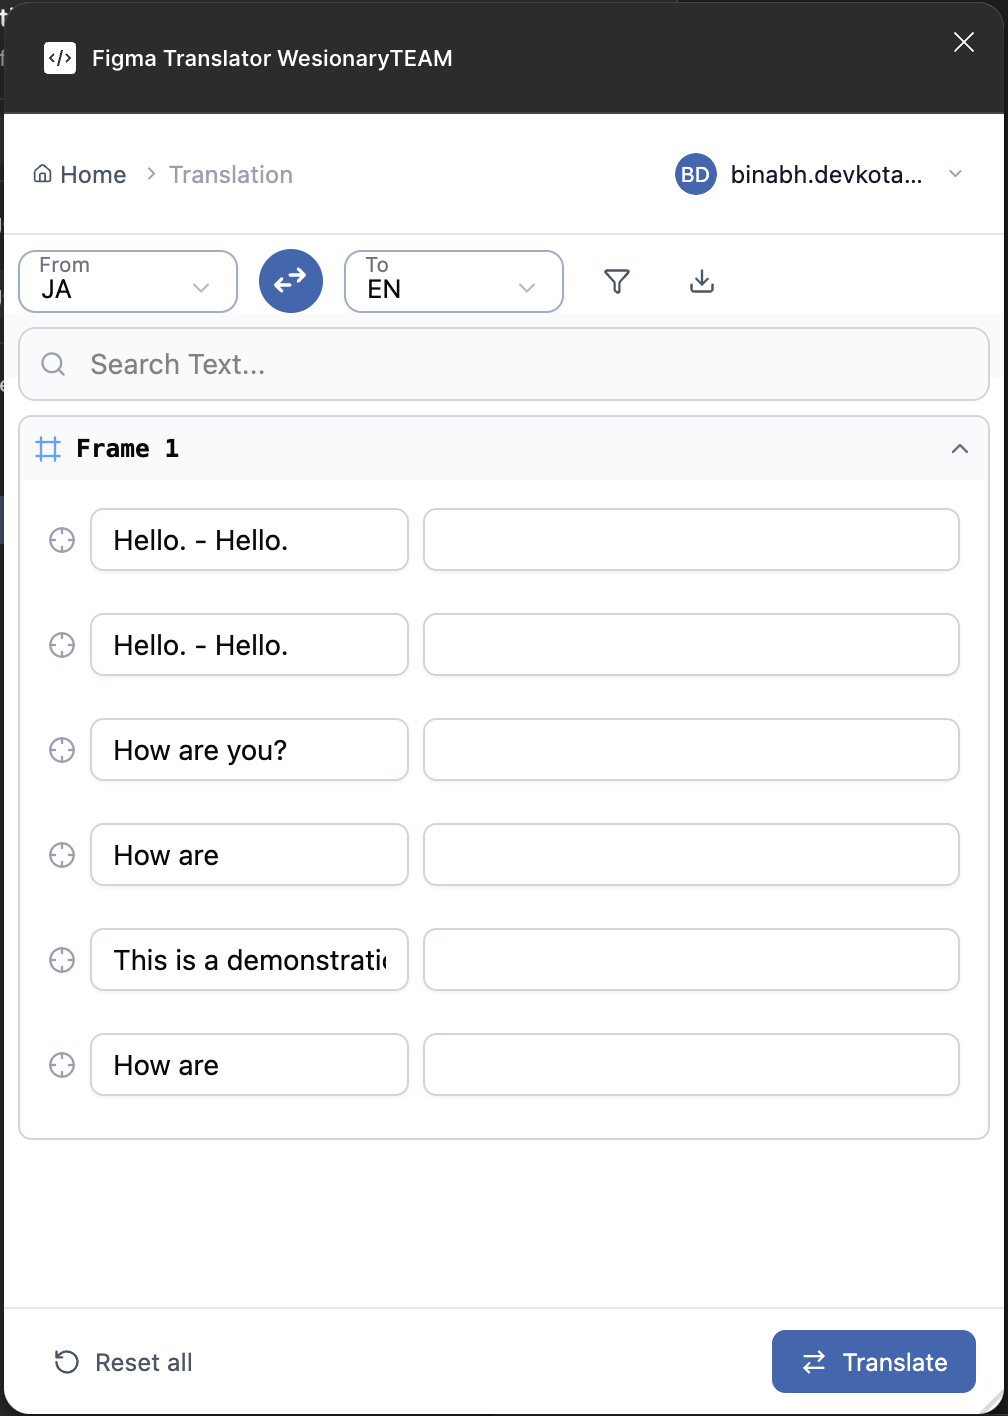
4. Translation Workspace
Language Selection and Setup
Setting Your Translation Languages:
- Source Language: Select your original text language (Japanese or English)
- Target Language: Choose the translation target language
- Language Swap: Use the swap button to quickly reverse translation direction
- Apply Settings: Your language choices are saved for the current session
Translation Process
Starting Translation:
- Review Extracted Text: Check the list of text elements in the workspace
- Apply Filters: Use filtering options to focus on specific content types
- Start Translation: Click the "Translate" button to begin automatic translation
- Review Results: Examine translated text and make manual adjustments if needed
- Save Progress: Your translations are automatically saved to the project
Advanced Filtering Options
The plugin offers powerful filtering to help you focus on specific content:
- Language-Only Filters:
- Only Japanese text
- Only English text
- Content Filters:
- Exclude numbers and symbols
- Show only untranslated text
- Display unique text only
- Show newly added content
💡 Pro Tip: Use the "Unique text" filter to avoid translating duplicate content multiple times, saving time and ensuring consistency.
5. Dictionary Management
Understanding Dictionary Types
The plugin provides two types of dictionaries to help maintain translation consistency:
- Project Dictionary: Specific to your current project, contains project-related terminology
- General Dictionary: Shared across all projects, contains common translations
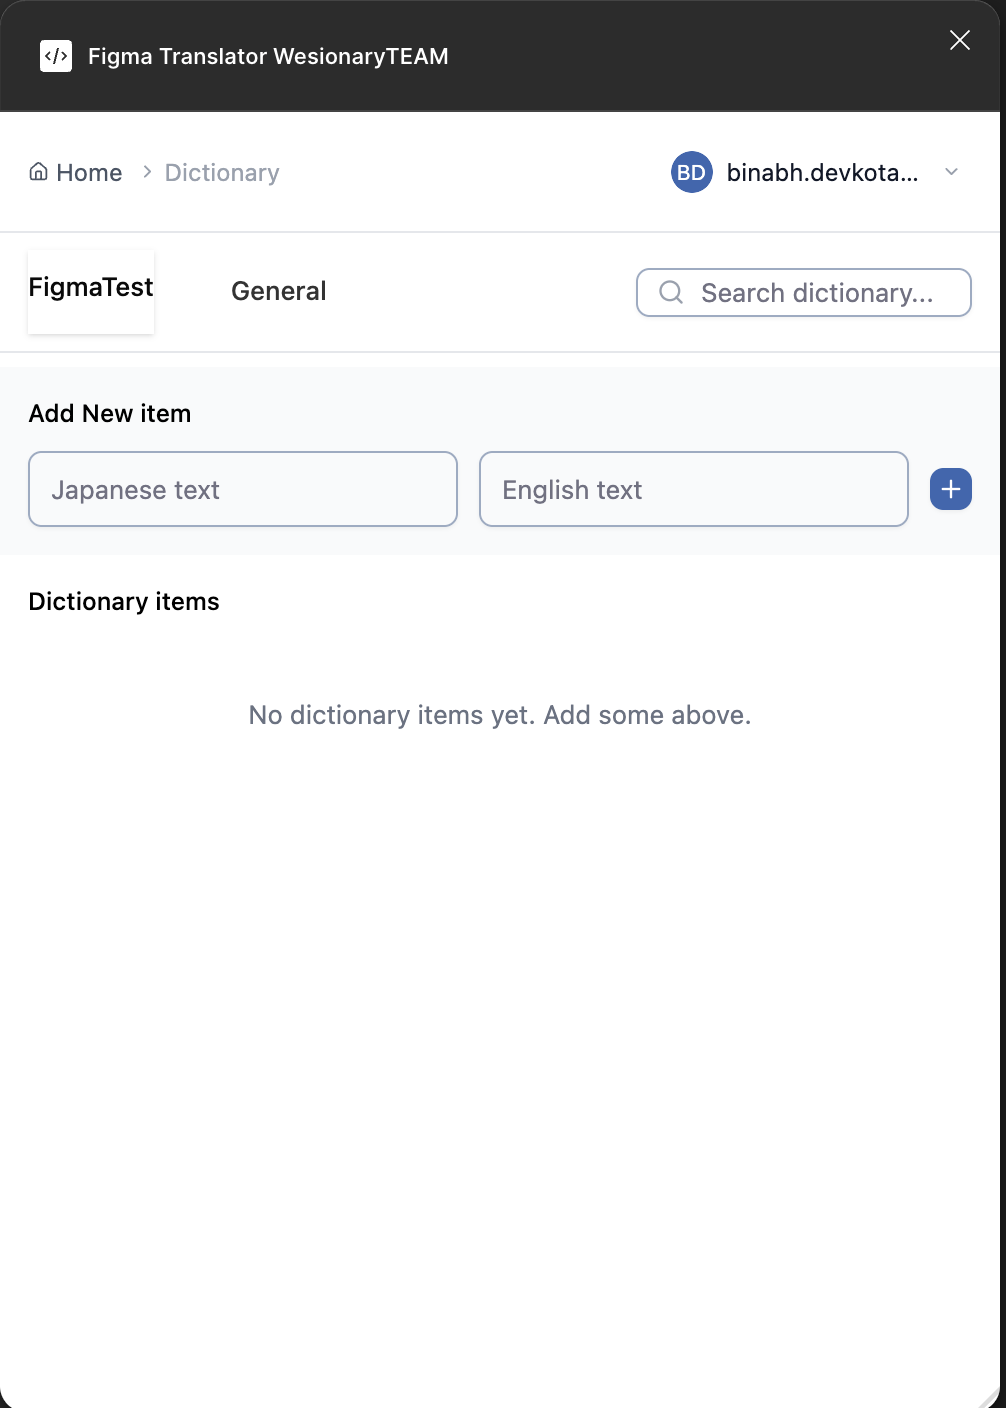
Adding Dictionary Entries
Creating New Dictionary Items:
- Navigate to Dictionary: Access the Dictionary section from the export menu
- Choose Dictionary Type: Select either Project or General tab
- Add New Entry:
- Enter Japanese text in the first field
- Enter English translation in the second field
- Click the + button to add the entry
- Save Changes: Dictionary entries are automatically saved
Managing Dictionary Entries
Dictionary Management Features:
- Search Function: Quickly find specific translations using the search bar
- Edit Entries: Click on any dictionary item to edit the translation
- Delete Entries: Remove outdated or incorrect translations
- Bulk Operations: Edit multiple entries and save changes together
🔍Smart Search: The search function works across both Japanese and English text, making it easy to find translations in either language.
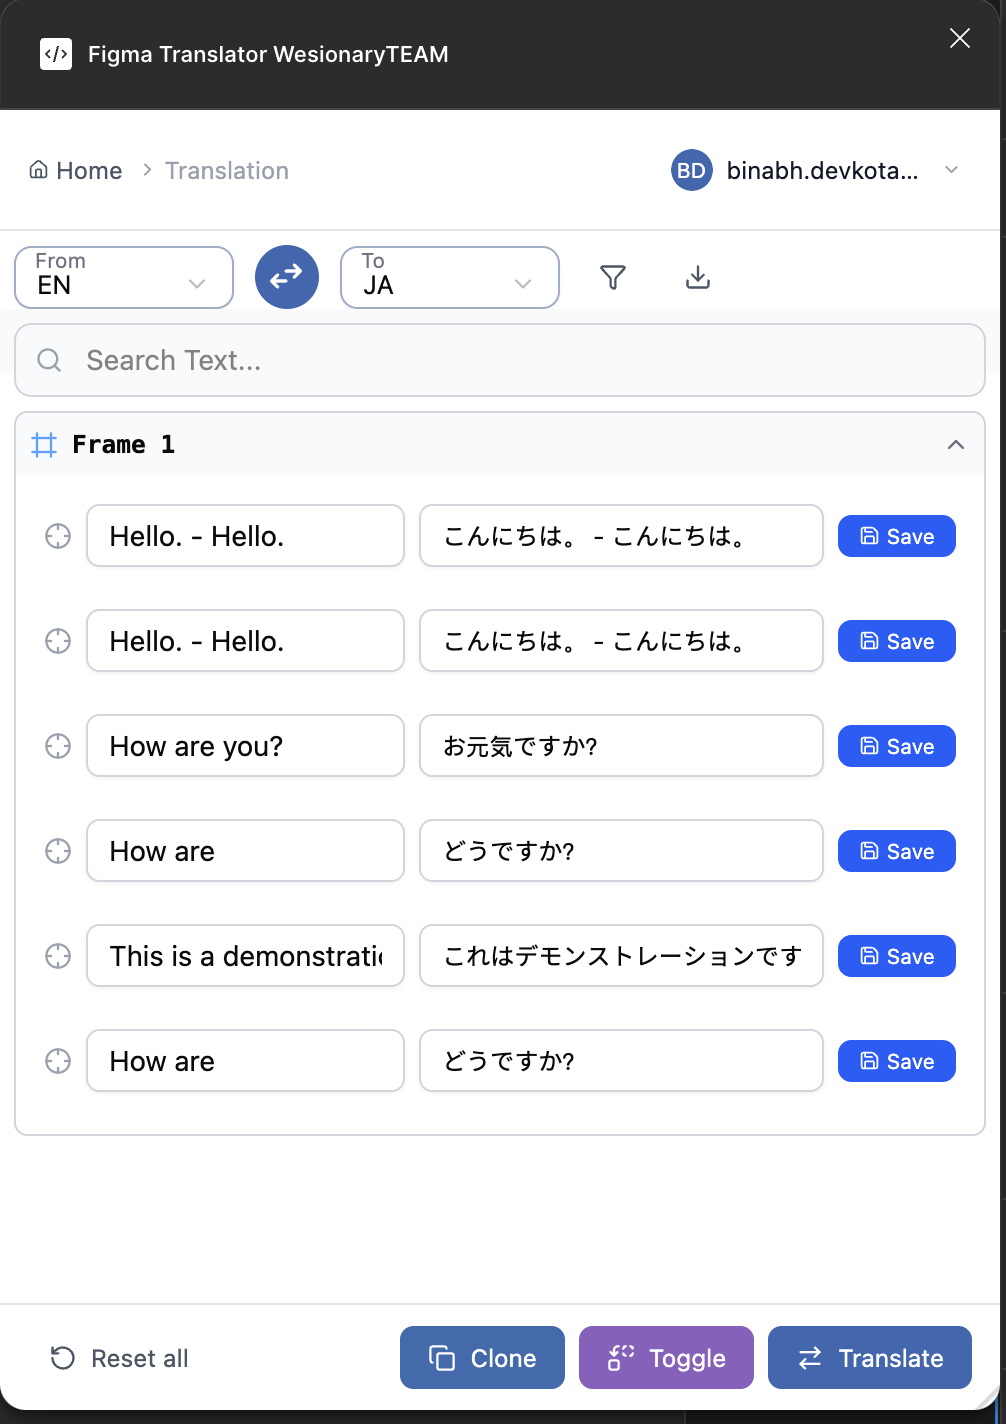
6. Clone Feature
Understanding the Clone Feature
The Clone feature creates a complete duplicate of your selected design with all text translated. This preserves your original design while providing a fully translated version.
📋Clone Benefits:
- Preserves original design intact
- Creates organized side-by-side comparison
- Maintains all design properties and layout
- Automatically organizes translated elements
Using the Clone Feature
Step-by-Step Clone Process:
- Complete Translation: Ensure your translations are complete and reviewed
- Access Clone Button: The Clone button appears after successful translation
- Initiate Clone: Click the Clone button in the translation workspace
- Monitor Progress: Watch the progress indicator as the plugin:
- Creates a duplicate page
- Copies all design elements
- Applies translations to text elements
- Organizes the layout
- Review Results: A new page will be created with "-Translated" suffix
💡 Layout Organization: The clone feature automatically arranges original and translated elements side-by-side for easy comparison.
⚠️ Font Compatibility: Ensure that fonts used in your design support the target language characters. The plugin will attempt to load required fonts automatically.
7. Toggle Feature
Understanding the Toggle Feature
The Toggle feature replaces original text directly in your design with translations. This creates an in-place translation without duplicating your design.
⚠️ Important: The Toggle feature modifies your original design. Consider using Clone first to preserve the original, then use Toggle on the duplicate if needed.
Using the Toggle Feature
Step-by-Step Toggle Process:
- Complete Translation: Ensure all translations are finalized
- Access Toggle Button: The Toggle button appears alongside the Clone button
- Initiate Toggle: Click the Toggle button to start the process
- Monitor Replacement: The plugin will:
- Store original text for potential rollback
- Replace text elements with translations
- Handle font loading automatically
- Report any errors encountered
- Review Changes: Check the updated design for proper text replacement
Toggle vs Clone: When to Use Each
| Feature |
Clone |
Toggle |
| Original Design |
Preserved |
Modified |
| Output |
New translated page |
In-place translation |
| Use Case |
Comparison, presentation |
Final production design |
| Risk Level |
Low (non-destructive) |
Medium (modifies original) |
8. Troubleshooting
Common Issues and Solutions
Login Problems
- Issue: Login window doesn't open
Solution: Check if pop-ups are blocked in your browser, allow pop-ups for Figma
- Issue: Authentication timeout
Solution: The plugin retries automatically for 6 minutes. Check your internet connection
Translation Issues
- Issue: Some text not detected
Solution: Ensure text is not in hidden layers or locked components
- Issue: Translation fails for certain text
Solution: Check for special characters or very long text strings
Clone/Toggle Problems
- Issue: Font loading errors
Solution: Ensure fonts support target language characters, or change font before translation
- Issue: Layout becomes distorted
Solution: Check auto-layout settings and text constraints in your original design
Best Practices
- Prepare Your Design: Use auto-layout and proper text constraints to handle different text lengths
- Test Fonts: Verify that your fonts support both source and target languages
- Organize Layers: Keep text layers properly named and organized for easier management
- Use Dictionary: Build a comprehensive dictionary for consistent translations across projects
- Review Translations: Always review automated translations for context and accuracy
- Save Frequently: While the plugin auto-saves, manually save your Figma file regularly
💡 Pro Workflow:
- Create and test your design with placeholder text
- Extract text and translate using the plugin
- Use Clone to create comparison versions
- Build your dictionary with project-specific terms
- Use Toggle for final production-ready designs
Getting Help
If you encounter issues not covered in this guide:
- Check the browser console for detailed error messages
- Ensure you have the latest version of the plugin
- Try refreshing Figma and restarting the plugin
- Contact the plugin development team for advanced support
Conclusion
The Figma Translation Plugin streamlines international design workflows by automating text extraction, translation, and layout management. With features like smart dictionaries, non-destructive cloning, and in-place text replacement, it's designed to save time while maintaining design quality.
Happy translating! 🌐